Installation
This guide walks you through installing the SaaS Module on your Perfex CRM. It's straightforward - just follow each step carefully.
Prerequisites: Make sure you've completed the Requirements checklist before starting this installation.
Watch the Installation Video
Prefer watching over reading? Here's a complete video walkthrough:
Step 1: Download the Module
- Go to CodeCanyon and find "SaaS Module for Perfex CRM" in your downloads
- Click the Download button
- Choose "Installable File Only" (this gives you just the module zip file)
- Save the
.zipfile to your computer
Important: Download the "Installable File Only" option - NOT "All files & documentation." The installable file is the one you'll upload to Perfex CRM.
Step 2: Upload to Perfex CRM
There are two ways to upload the module. Choose whichever is easier for you:
Option A: Upload via Perfex Admin Panel (Recommended)
This is the easiest method:
- Log in to your Perfex CRM Admin Panel
- Go to Setup (in the left sidebar)
- Click on Modules
- Click the Upload Module button (top right corner)
- Select the
.zipfile you downloaded in Step 1 - Click Upload
- Wait for the upload to complete (this may take a moment depending on your server speed)
Option B: Upload via FTP/SFTP
If the admin panel upload doesn't work (some servers have upload size limits), use this method:
- Extract the
.zipfile on your computer - Connect to your server using an FTP client (like FileZilla - it's free)
- Navigate to your Perfex CRM directory:
your-perfex-folder/modules/ - Upload the extracted module folder into the
modules/directory - The final path should look like:
your-perfex-folder/modules/saas/
What's FileZilla? It's a free program that lets you upload files to your web server. Think of it like a file manager for your website. Download it from filezilla-project.org.
Step 3: Activate the Module
After uploading, you need to activate the module:
- In your Perfex CRM Admin Panel, go to Setup �→ Modules
- You should see "SaaS Module" in the list of available modules
- Click the Activate button next to it
- The page will reload - this means the module is now active!
After activation, you'll notice a new menu item in your left sidebar: SaaS Management. This is your command center for everything SaaS-related.
 After activation, the SaaS Management menu appears in your sidebar with all configuration options
Step 4: Enter Your Purchase Code
- Go to SaaS Management → SuperAdmin Settings
- Enter your CodeCanyon Purchase Code
- Click Verify or Save
Where to find your purchase code: Go to codecanyon.net/downloads, find the SaaS module, click the Download dropdown, and select "License Certificate & Purchase Code." The purchase code is in the text file that downloads.
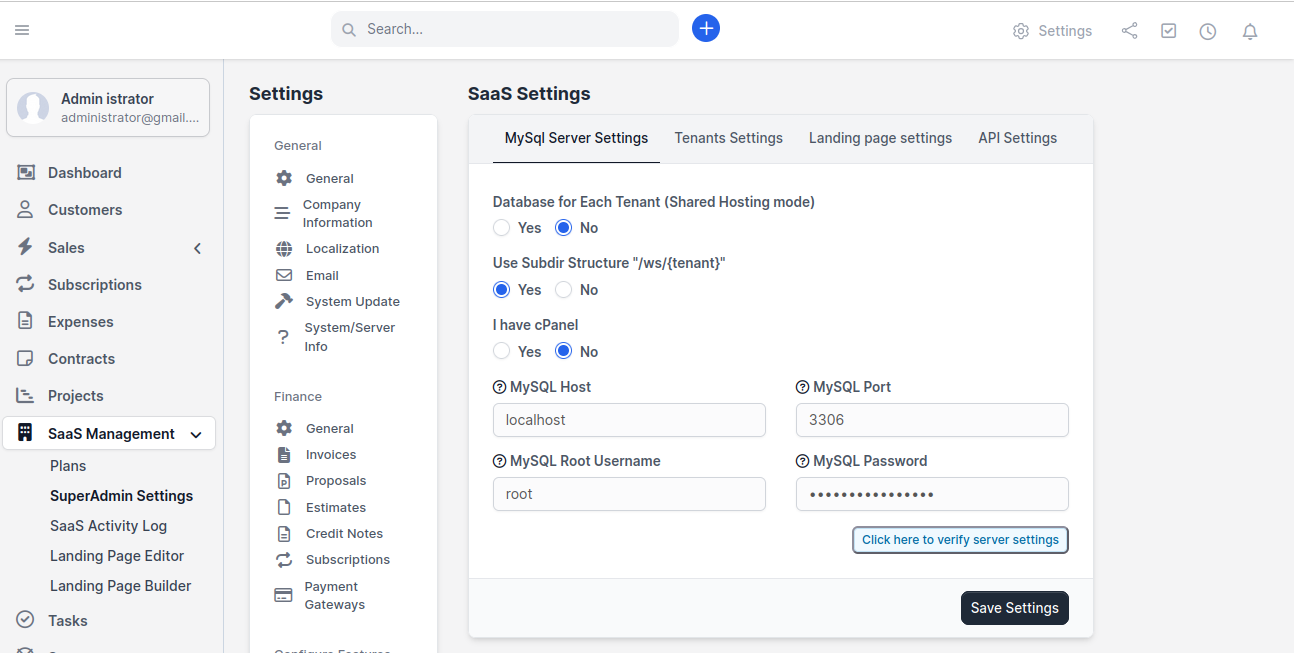
Step 5: Configure MySQL Server Settings
This is the most important configuration step. The module needs MySQL credentials to create databases for your tenants.
- Go to SaaS Management → SuperAdmin Settings
- Click the MySQL Server Settings tab
- Fill in the following fields:
| Field | What to Enter | Example |
|---|---|---|
| Database for Each Tenant | Select Yes for isolated databases (recommended) or No for shared database | Yes |
| Use Subdir Structure | Select Yes if you want yoursite.com/ws/tenant-name URLs | Yes |
| I have cPanel | Select Yes if your server uses cPanel, No if not | Depends on your hosting |
| MySQL Host | Usually localhost | localhost |
| MySQL Port | Usually 3306 | 3306 |
| MySQL Root Username | Your MySQL username with CREATE DATABASE privilege | root |
| MySQL Password | The password for the MySQL user above | your-password |
MySQL Server Settings - fill in your database connection details here
- Click "Click here to verify server settings" - this tests your MySQL connection
- If verification succeeds, click Save Settings
Verification failed? This usually means:
- The MySQL username or password is wrong
- The MySQL user doesn't have CREATE DATABASE privileges
- MySQL is not running on the host/port you specified
Double-check your credentials and try again. See Troubleshooting → Installation Issues for detailed fixes.
Step 6: Verify Everything Works
Let's make sure everything is set up correctly:
- Go to SaaS Management → Plans
- Try creating a test plan (you can delete it later)
- Go to your site's landing page URL and see if the registration form appears
If all three checks pass - congratulations! The module is installed and working!
What's Next?
Now that the module is installed, you need to configure it for your business:
- Configure DNS & Domains - Set up how tenant URLs will work
- Set up your SaaS Settings - Configure tenant settings, plans, and landing page
- Create your first plan - Set up pricing and features
Installation complete! You're now running a multi-tenant SaaS platform. Continue to the next guides to customize everything for your business.